

Why a hammock? The simple answer is comfort. I, personally, find sleeping in a hammock to just be better than a tent. Now I have spent many years tent camping. And I enjoy NOT having to look for level ground, clearing the area of sticks and rocks, and fighting with poles to set up the tent. Instead now I just have to find 2 trees that are the right distance apart and put straps around them to hang my hammock from.
Now, don’t get me wrong, there are going to be times when my hammock will be at home and I’ll be using the tent, like if I’m not expecting to have trees around to hang the hammock from. But for the most part, my hammock will be my primary camping shelter.
Sleeping in a hammock you’ll typically be sleeping on your back. So hammocking may not be for you and knowing this i wasn’t sure if I would be able to do it. I’m typically a stomach sleeper at home. So I decided that if I was going to try this hammock thing out, I wasn’t investing alot of money into something I didn’t know if I could do. My initial total investment to my introduction to hammock camping was just under $80.
My initial hammock setup was as follows:
- Kepeak hammock w/bug net
- Repurposed Coleman tent rain fly
- Aluminum tent stakes from broken Coleman tent
- Guy lines from broken Coleman tent
- 550 cord for tarp ridge line
- Synthetic cord that came with the hammock to hold up bug net
- Bliss Hammock suspension
- Subito light weight Underquilt
- Military Sleep System Patrol bag

My initial hammock setup served it’s purpose quite well. It allowed me to not only discover and get my feet wet hammock camping, but it taught me what worked, what didn’t work, and where to focus my upgrade efforts. It also allowed me to find out if I, an avid stomach sleeper, could actually sleep a full night in a hammock.


My current hammock setup is as follows:
- Kepeak hammock w/bug net
- Homemade spreader bars for the bug net
- Rain fly Evolution 10’x12′ Tarp
- MSR style Aluminum tent stakes
- 275 cord for guy lines
- 275 cord for tarp ridge line
- 275 cord for hammock ridge line
- Bliss Hammock suspension
- Kepeak tarp 5’x4′
- Colman aluminum shepherd hook stakes
- Subito light weight Underquilt
- Military Sleep System Patrol bag
- Klymit X-Pillow
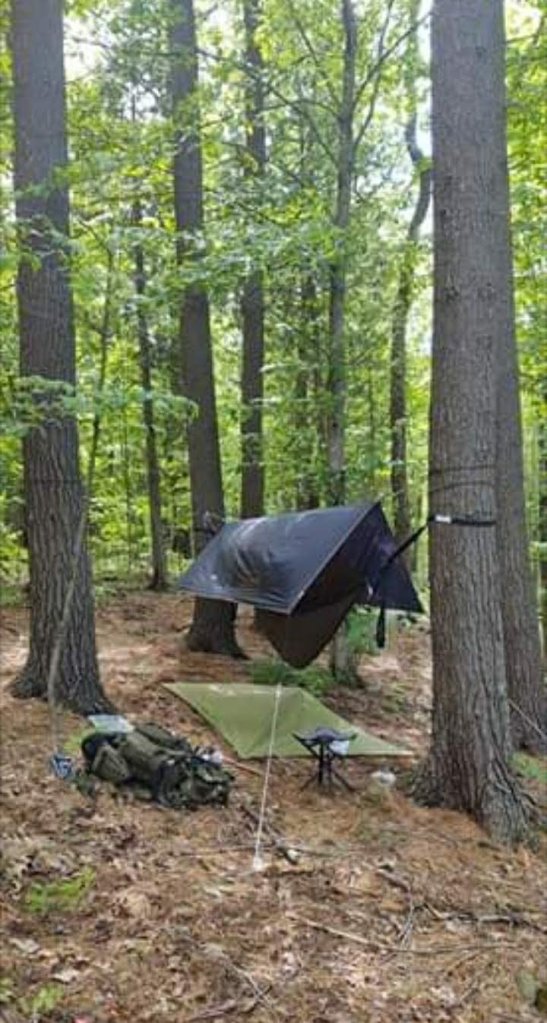
My Current Hammock “Kit”
The following is my thoughts and experiences with each individual component of my hammock setup/kit.
The Tarp
I recently upgraded my tarp from a repurposed rain fly from a broken Coleman tent I had to the Rain Fly Evolution tarp. I purposely bought it at 12ft long because I have another hammock that’s 11ft long I’ve yet to take out and use, so I wanted to have the coverage for the longer hammock without needing to but another tarp.
The tarp has plenty of coverage for my needs with more than enough overhang to keep me dry in the rain. I had a few color options to choose from but I choose black for a couple reasons. First, I didn’t want the same color as the people I camp with, that way I can minimize confusion on who’s setup where. And second, most of the time, I’m gonna be in the woods under the canopy. A black tarp retaining and radiating heat on me during the day was not a concern and what heat came off it at night would be welcomed.
All in all for the approximate $40 I paid for this tarp, I’m happy with it so far. It may not be the lightest, weighing in at 1.75lb, but I don’t mind the extra weight for the extra coverage it gives. I know there are lighter tarps available, but they’re more expensive and out of budget for me at the moment.
The Hammock
My current hammock of choice is my 8ft Kepeak hammock with seen in bug net bought off Wish.com. I’m 5ft 11in tall and in the 300lb range. This hammock has been great so far. It has held up to the stresses of someone my size.
Overall I have found it to be very comfortable to sleep in and can regularly get 8 hours uninterrupted sleep. I’ve been told that a longer hammock will add comfort but I’ve yet to test that out even though I have an 11ft hammock without a bug net.
Klymit X-Pillow
How do I sum up this pillow? It is super light and folds up smaller than the palm of your hand. It’s very adjustable do to being blown up. I needed a compact pillow that was light weight and this pillow fits that bill. Because of it’s adjustability it’s very comfortable to sleep with.
The Underquilt
So far my underquilt has been phenomenal. I have no issues with it keeping me warm through the night when it’s hung properly. I know it doesn’t look like it would do much but looks can be deceiving.
I bought a Subito underquilt for $39.99 from some random website I found is a Google search.
The Suspension System
For now, my cheap Walmart purchased suspension system works just fine. I do have a few ideas on how I can improve on it. So far, it works great and because it’s a daisy chain style, you have some adjustability to dial in your hammock.
The Overquilt
I do not have a purpose made Overquilt for my setup at this time. Instead I use either a top sheet or one of my many sleeping bags I have. What I use or what combination used is dependant upon the temperatures expected on that particular trip. However, my lowest temp limit at this time is set due to my underquilt.
The Guy/Ridge Lines
I currently run 275 Paracord for all my lines. Before I purchased the 275 cord, I was using 550 cord. I went with the 275 cord to save on weight. In the near future I plan on replacing the 275 cord with Amsteel for added strength and additional weight savings.
The Ground Tarp
The Kepeak tarp I use as a ground tarp was originally bought to go over my hammock not under it. However, when I did a test setup with my hammock and this tarp, I found it to be too short to give adequate coverage even on a diagonal.
So it got folded back up and put on the gear shelf while I tried to figure out how or if I was going to use it. Then one day I had the brilliant idea that it might make a good ground cloth under the hammock. On my next trip I tried it out and it worked well. Now wether I use it or not, it goes with me.
The Stakes
I use 2 different style stakes in my hammock setup. Each serve a specific purpose and work remarkably well in their role.
The first type of stake I use is the MSR style. This one has 3 blades that come off a central point the length of the shaft. This type of stake I’ve found to be very stable every time I’ve used them. I’ve only had one bend on me while moving it through rocky soil. When I got home after cleaning it, it went in my vice and got straightened as best I could get it. To this day, I still use that stake and it has yet to fail me.
The second type of stake I use is an aluminum shepherd hook. It is a simple straight stake. I only use this one to secure my ground tarp to the ground. For me this is all it’s really good for.
Final Thoughts
I was hooked my first night when I got one of the best nights sleep I’ve had in a long while. When I get my hang just right, it is, to me, more comfortable than my bed at home. I’ve also noticed that most mornings when I wake up in my bed, I’m at a slight angle as if I were in my hammock.
It may be a cheap entry level setup, but it’s adequate for it’s intended purpose. It’s still a hell of a lot more comfortable than sleeping on the ground in my opinion. While it’s not ultra lightweight compare to some, it still works remarkably well.
The fun comes in planning and deciding on the upgrades to the setup. What hammock to get, what size hammock, what tarp, doors or no doors, size, etc. How light do you want to get with your setup? 2 season, 3 season, year round? So many aspects to consider, yet when you get it right for you, the choir of angles come down from from on high singing the ability of harmonious perfection and you know what it’s like to be a cloud floating through the sky.
Links
- Kepeak hammock w/bug net
- Rain fly Evolution 10’x12′ Tarp
- MSR style Aluminum tent stakes
- 275 cord
- Bliss Hammock suspension
- Kepeak tarp 5’x4′
- Colman aluminum shepherd hook stakes
- Subito light weight Underquilt
- Military Sleep System Patrol bag
- Klymit X-Pillow

