

Food, glorious food… It’s said you can 21 days without before you have starved to death. Do many of us modern humans really go more than a few hours without stuffing something in our faces? I know I don’t, so being able to cook even in the most basic way is a priority for me. In this gear based episode, we’ll be looking at and talking about my personal Cooking Kit.
The following list is everything that might go with me at one time or another. I will be touching on everything listed in this episode.
- 2 piece pot set
- Colman 8oz butane fuel canister
- Colman Peak1 Butane Burner
- Fuel can stabilizer
- Bic Lighter
- Collapsible Tripod
- Collapsible Grill
- Copper Mat
- Gerber Compleat spork set
- Collapsible 2 prong fork
Food
I, like most Americans, have a love/hate relationship with food. I love having a full belly, yet hate the amount of food it normally takes to get there. Because of this, over the years, I’ve become overweight and have a tough time trying to loose some weight, but that’s a story for another day.
When I first started out Backcountry camping, I wasn’t as concerned about the weight of my pack. So I would pack food items I bought from the grocery store. Things like trail mix, hotdogs, etc. And just in case something happened to the main food supply, I’d pack a few MREs as added insurance that I wouldn’t starve.
Now that I’m counting ounces on the weight of my pack, I’ve turned to dehydrated or freeze dried meals. On my most recent trip I bought a couple of the Mountain House meals. While they are a bit pricey for my budget, $6-$8 per meal, they were delicious and filling.
In an effort to save money while still saving weight, I plan to get the equipment to make my own dehydrated meals to take with me instead of store bought meals.
2 Piece Pot Set
A few years ago I bought a cheap light weight pot set with the sole purpose to use it to build a cook kit around. Well, I finally got around to starting that project this year, 2021. It has only taken me about 5 years to get around to putting it together.
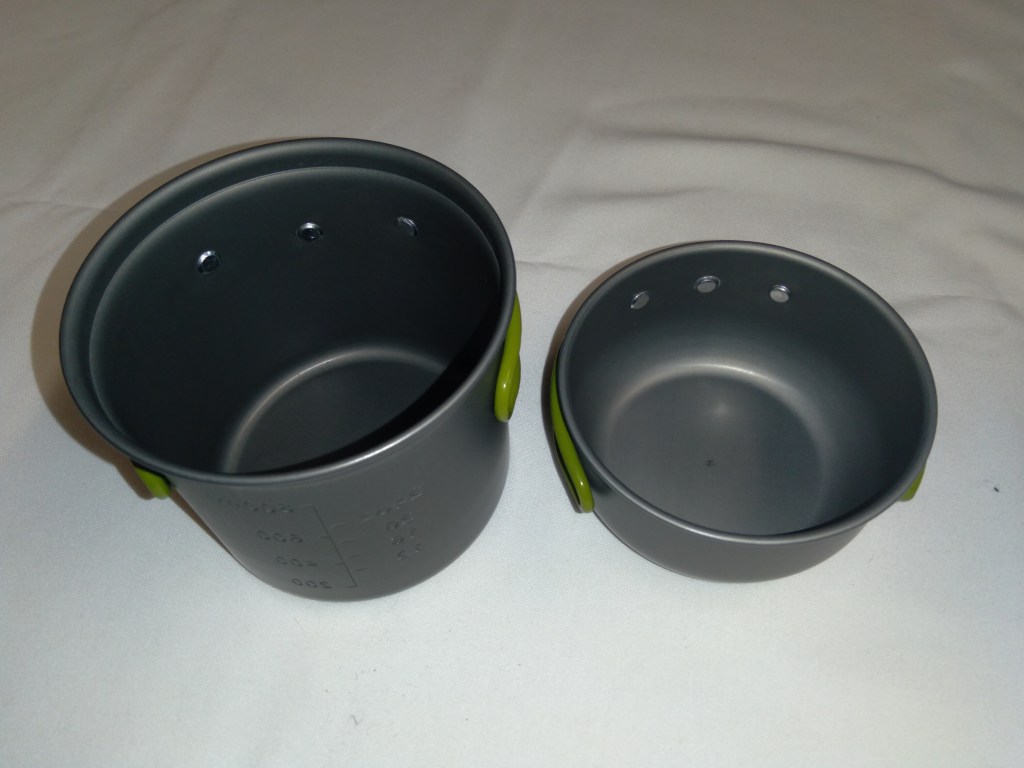
On my camping trip in May 2021, I finally got to use the pot set. Seeing as there’s a great range in manufacturing quality when buying off Wish.com, I knew from the grapevine that the rivits on the handle are a weak point and tend to fail. So with a little push from my buddy, Andrew, I did a little cooking with it in the weeks leading up to my trip.
The pot set itself, at least the one I got, is well enough made. The pots themselves are made from aluminum. The larger pot, with a 800ml capacity, is big enough for most of my cooking needs and features indented lines to mark volume in ounces and milliliters.

The smaller pot can be used to heat small amounts of liquid, as a lid for the large pot, or even as a cup. The small pot nests upside down on top of the large pot making for convent storage inside for most of my cooking kit.
As I’ve found out through usage, once you’ve emptied the pots of their hot contents, they cool very quickly. I like this as I can clean them and put them away as soon as I’m done eating so I don’t attract unwanted animals.
Colman Peak1 Butane Burner, Butane Fuel, and Can Stabilizer
Where to start on this section… I guess we can start at the ground and work our way up…

I spoke with my buddy, Andrew, about what fuel can stabilizer to get and if really even needed one. As it turns out, they can be more useful than just slightly elevating your fuel can off the ground. On uneven ground, it can help to level it as well as making it a little more stable while you cook on the burner.
I went through 2 stabilizers so far. The first was highly recommend by Andrew, and was super easy to deploy, however, I had severe difficulty attaching it to the fuel can and ultimately ended up breaking it. I will leave this one unnamed as it could have been a flaw in the quality of that particular one. So I won’t speak badly about it until I have the chance, if I choose, to buy another and give it another try.

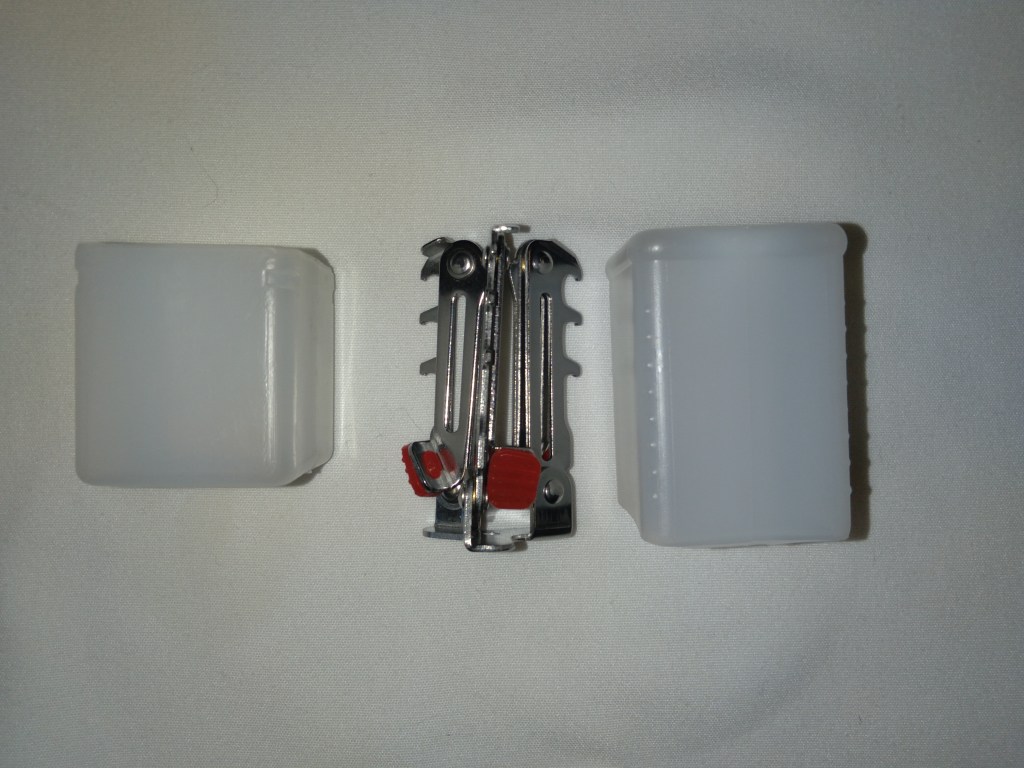
The replacement stabilizer I got is much more robust and actually, according to manufacturer specs weights a little less than the first one. For the replacement, I went with MCAMPAS 304 Stand. It is a universal stand that can accommodate most butane fuel canisters. On my canister, it’s secure for the most part, but does sit loose and will rattle if shook slightly. For myself, it’s not a huge deal, though I’d like it to be a little more secure, but it works and does it’s job well enough.
This stand weights in at just 0.07KG. I do not believe this weight includes the plastic storage box it comes with.
From Amazon
Sturdy Material: 304 Stainless Steel of Whole Unit
Easy to Use: Folding Design Easy Open and Close Stable to Fix the Small Butane Canister When Outdoor
Moving on up, we arrive at the fuel canister, the soul of this stove setup. I’ve used my 8oz Colman Butane canister about 6 times since I bought it at Walmart. It seems to still have plenty of fuel to possibly get me through the season without the need to replace it. But time will tell. Not much really at this point to tell you about the fuel canister.

The burner, if the canister is the soul, the this is the brains of the stove kit. From Walmart, I grabbed the Colman Peak1 Butane Burner. The Colman Peak1 is a single burner stove that screws directly into the fuel canister. This model has 3 holders that fan out to sit your pot, cup, etc on it as long as it’s fairly level. Additionally, the knob allows you to adjust the flame just like your stove. Unlike your gas stove however, there is no igniter and you will need to supply your own ignition source.

Out of the few times I have used this stove setup, I am pleased with it’s performance this far. This will likely have a permanent home in my pack despite the extra weight of everything together. On my last camping trip, I very much enjoyed its convenience.
Gerber Compleat
OMG!!! I have nothing bad to say about this piece of gear. If there’s ONE thing I think everyone must buy, this would be it. The Gerber Compleat is very light weight and highly versatile.
I’ve had mine about a year or two now. I believe I have used it, to date, in every configuration possible. My buddy, Andrew, brought his to one of our camping trips and immediately I knew I had to have one eventually. Upon receiving mine, it immediately replaced my sporks I used to take, and is my go to silverware set when camping. Hell, sometimes I’ll go grab it and use it at home too. I love the Gerber Compleat so much, I bought my little brother one as a Christmas gift one year.
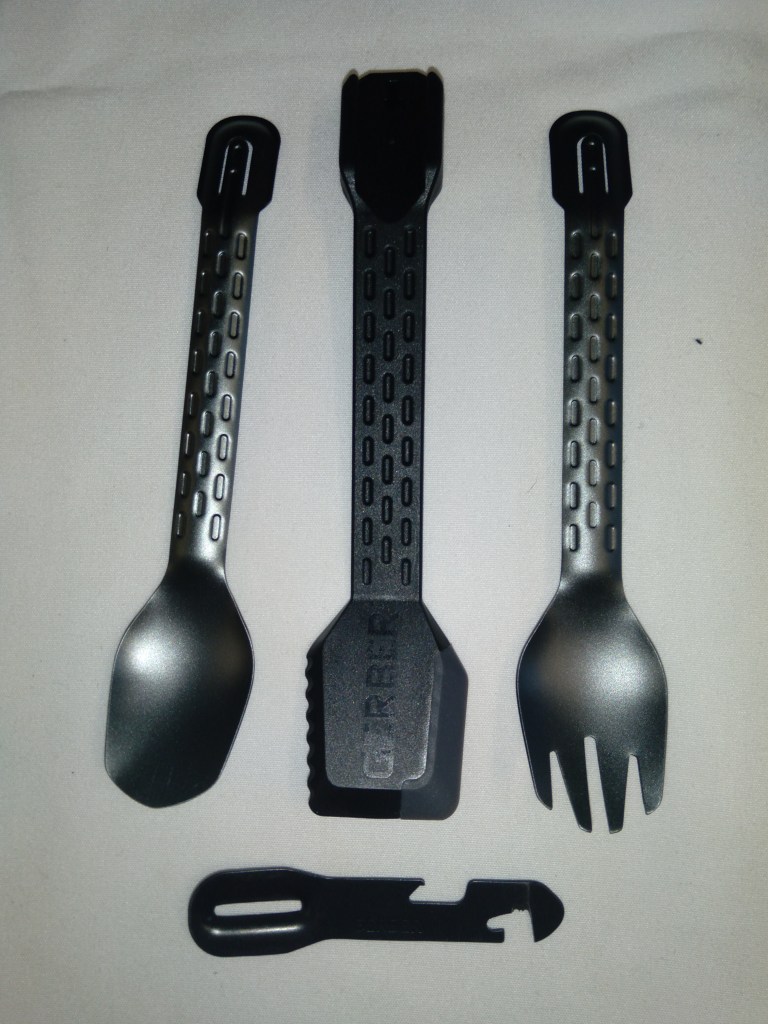
I absolutely love the Gerber Compleat. And at $21.99 from LA Police Gear, it’s the cheapest price I’ve found from a reputable online retailer. It’s worth noting, that I got duped by a site selling it cheaper where I’ve yet to either receive a refund or the Gerber Compleat I ordered from them. So buyer beware, of where you buy from if shopping for the cheapest price.
From LA Police Gear
Spatula [serrated & silicone edge]
High temp nylon w/ silicone overmold
Long tine fork
Deep basin spoon
Tongs [fork or spoon + spatula]
Multi-tool components:
Bottle opener
Veggie peeler
Serrated package opener
Can opener
Limited lifetime warranty
Length: 7.75 in
Weight: 2.3 oz
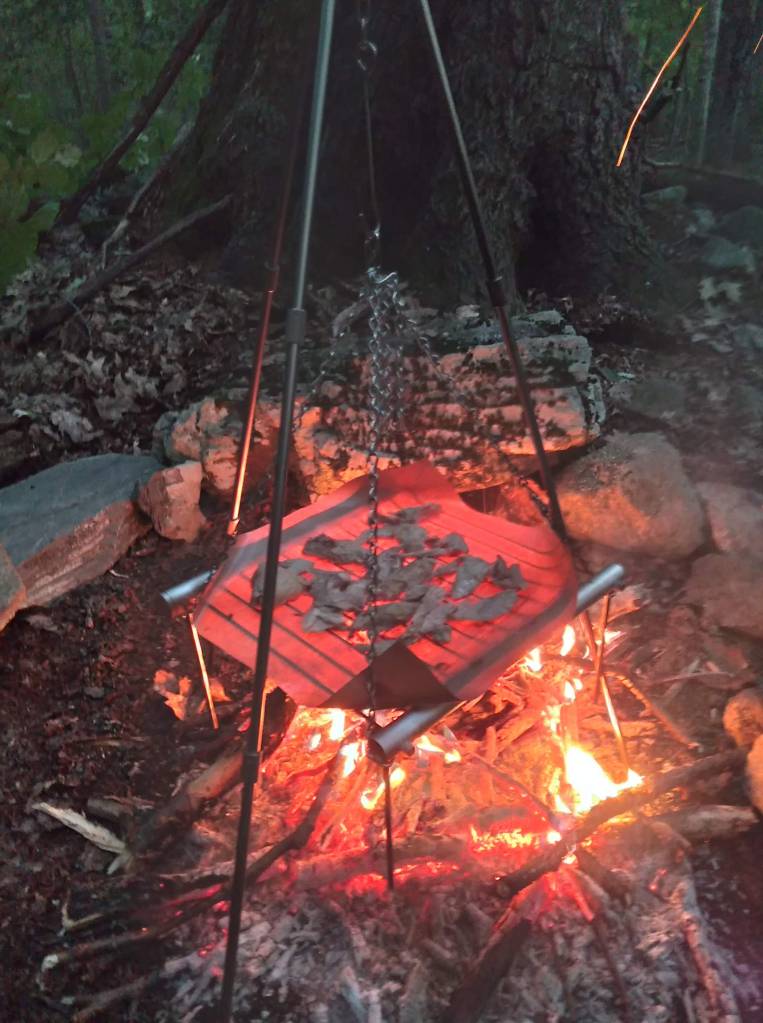
Collapsible Tripod
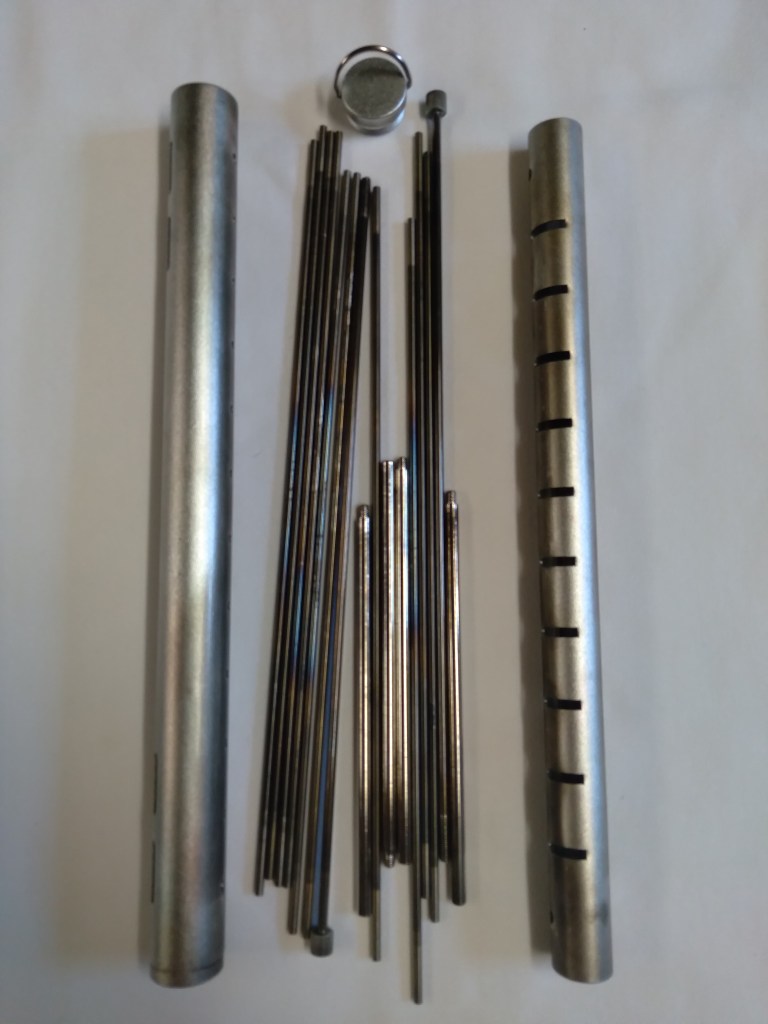
This particular tripod came in a survival box called Apocabox by Creek Stewart. However, outside wish.com, I’ve not been able to find them. I wanted to purchase some extra legs to give it a little extra height, not that it really needs it, just a personal preference.
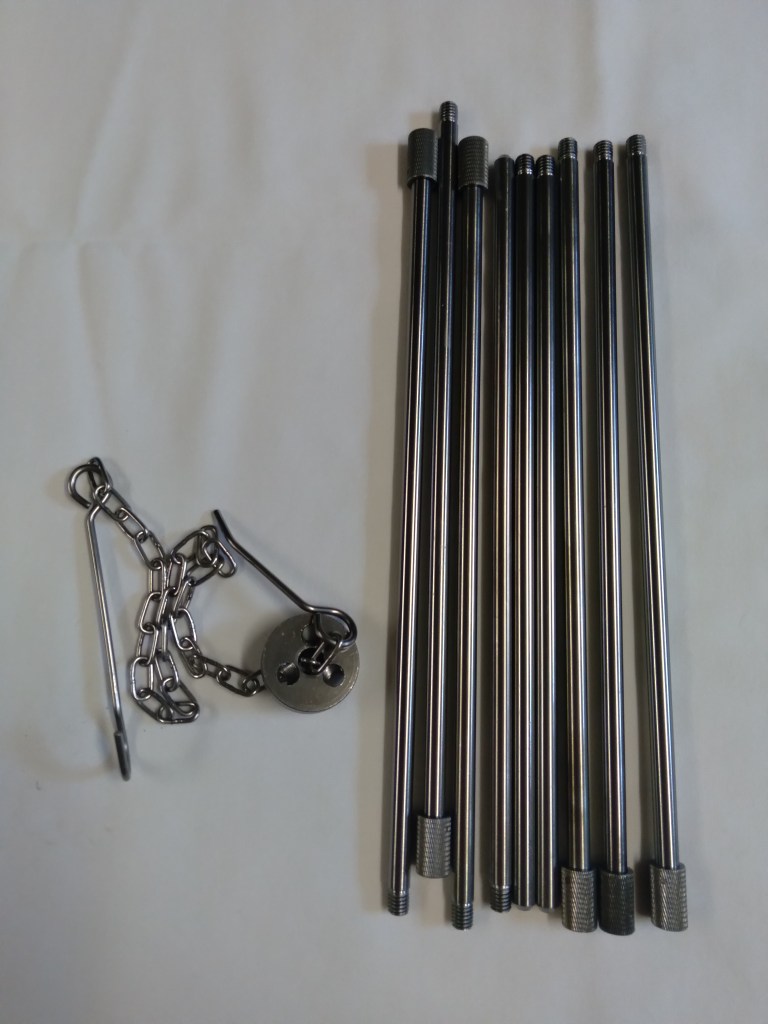
The tripod itself is made from aluminum, and is easy enough to clean with either steel wool or one of those brillo type green scrub pads. The legs unscrew from the top center point and break down into 3 smaller sections. The top center section houses the chain and hanging hook. The chain and hook are a permanent fixure of the center section as the hole the chain goes through is just big enough for the chain.
Assembly of the tripod is easy enough. Simply screw together the 3 leg sections of each leg to one another then screw the assembled leg into the center brace. You must be careful as the threads on the center section ARE at an angle. So you can misalign them and cross thread them or strip them all together.
In my opinion, I think the hook is a little bit long for the size of the tripod for how I use it most of the time. It is also worth noting that I did custom make a hanging chain for the grill to be used with this tripod which adds to the excess length in the hook. I have another modification to test out and will eventually do a revisit on the tripod at a later date.
I wouldn’t mind seeing a titanium version to save on weight even though it only weights in at 0.26lbs.
Collapsible Grill and Copper Mat
I love my grill. It’s compact, small, and light weight (0.75lbs). Ok maybe not THAT light weight and yes there are other options out there that are significantly more light weight than this one. When ready to cook, the grill is 12″x11″ standing apx 6 1/2″ tall with a cooking space of 9″x10″. However, I’ve yet to find one with 90in² of cooking surface that packs down into 12″x1″ space. This doesn’t mean it doesn’t exist, it very well could, I just haven’t found it yet.


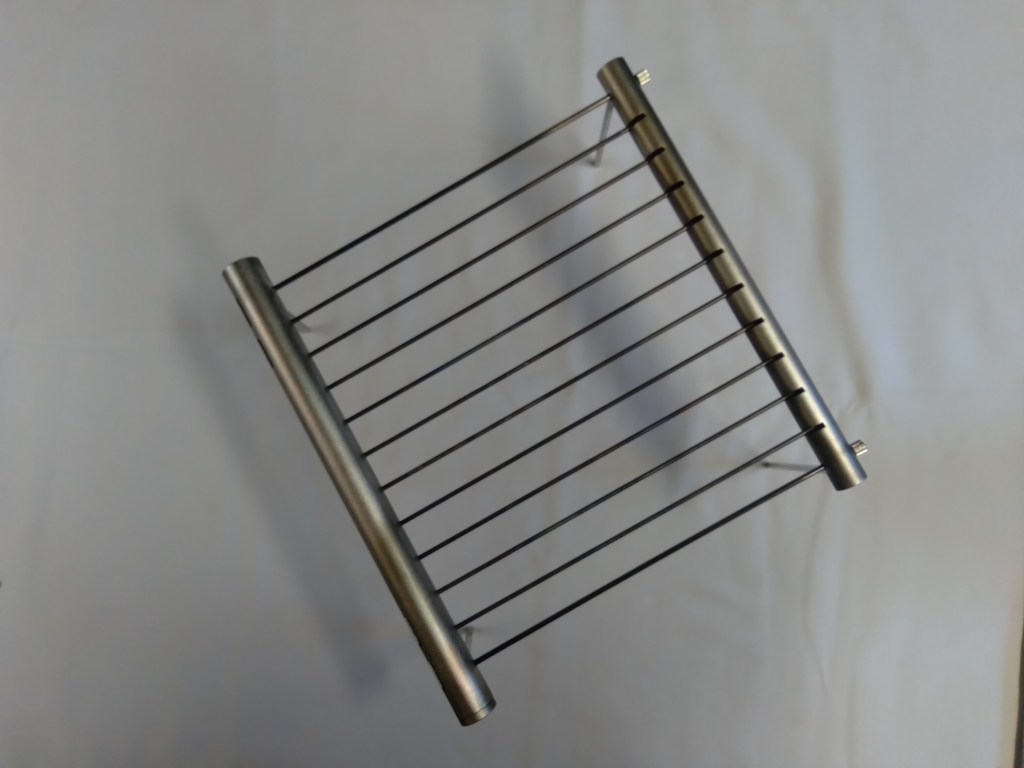

I enjoy using it simplely because I get to grill over an open fire, imparting that natural smokey flavor of whatever wood I’m burning. However, it’s not exactly “easy” or quick to deploy when you get to your campsite. It does take some time and patience to assemble. And as with anything, the more you do it, the faster and more proficient you become.
The copper Mat was a must have for me even before I got my grill. We received some as a gift that we used on the big grill on the back porch. I mainly use the mat to cook fish or anything else that might fall through slots in the grill. It comes in a sheet approximately 5″x9″. I had to cut my sheet down to fit my camping grill. The mat was easily cut using standard scissors, no special cutting tools required, which was both nice and convenient.

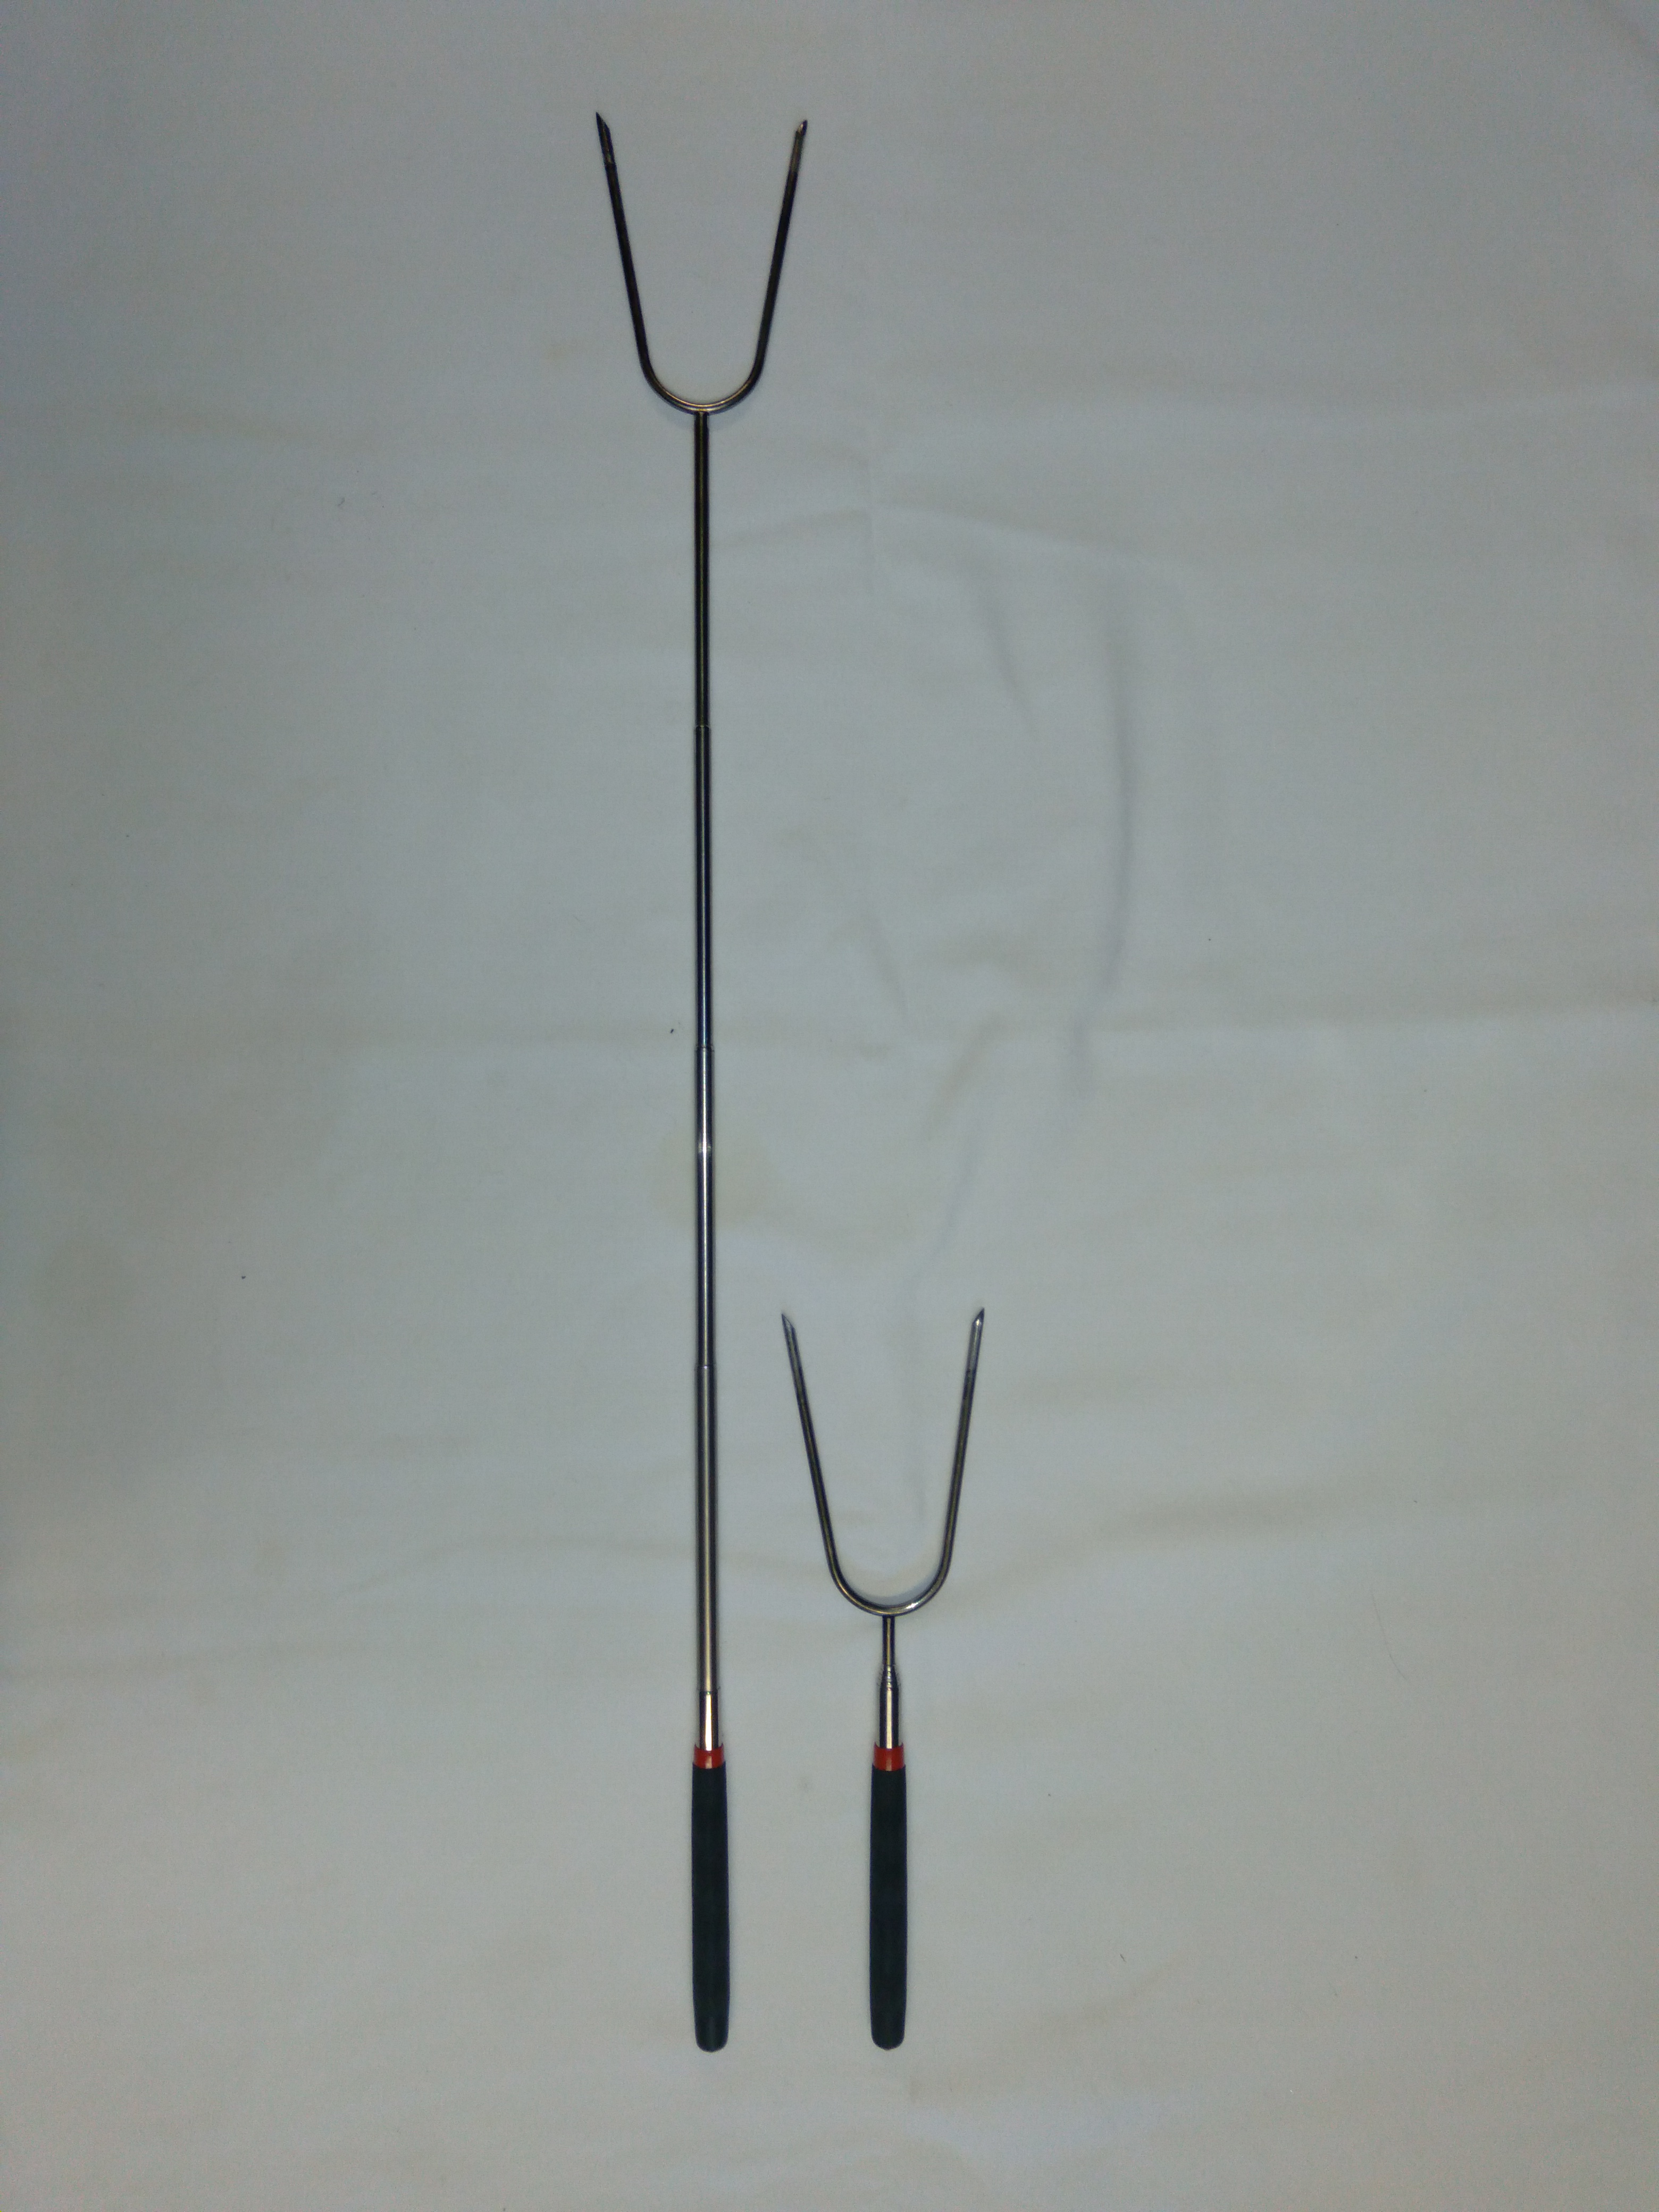
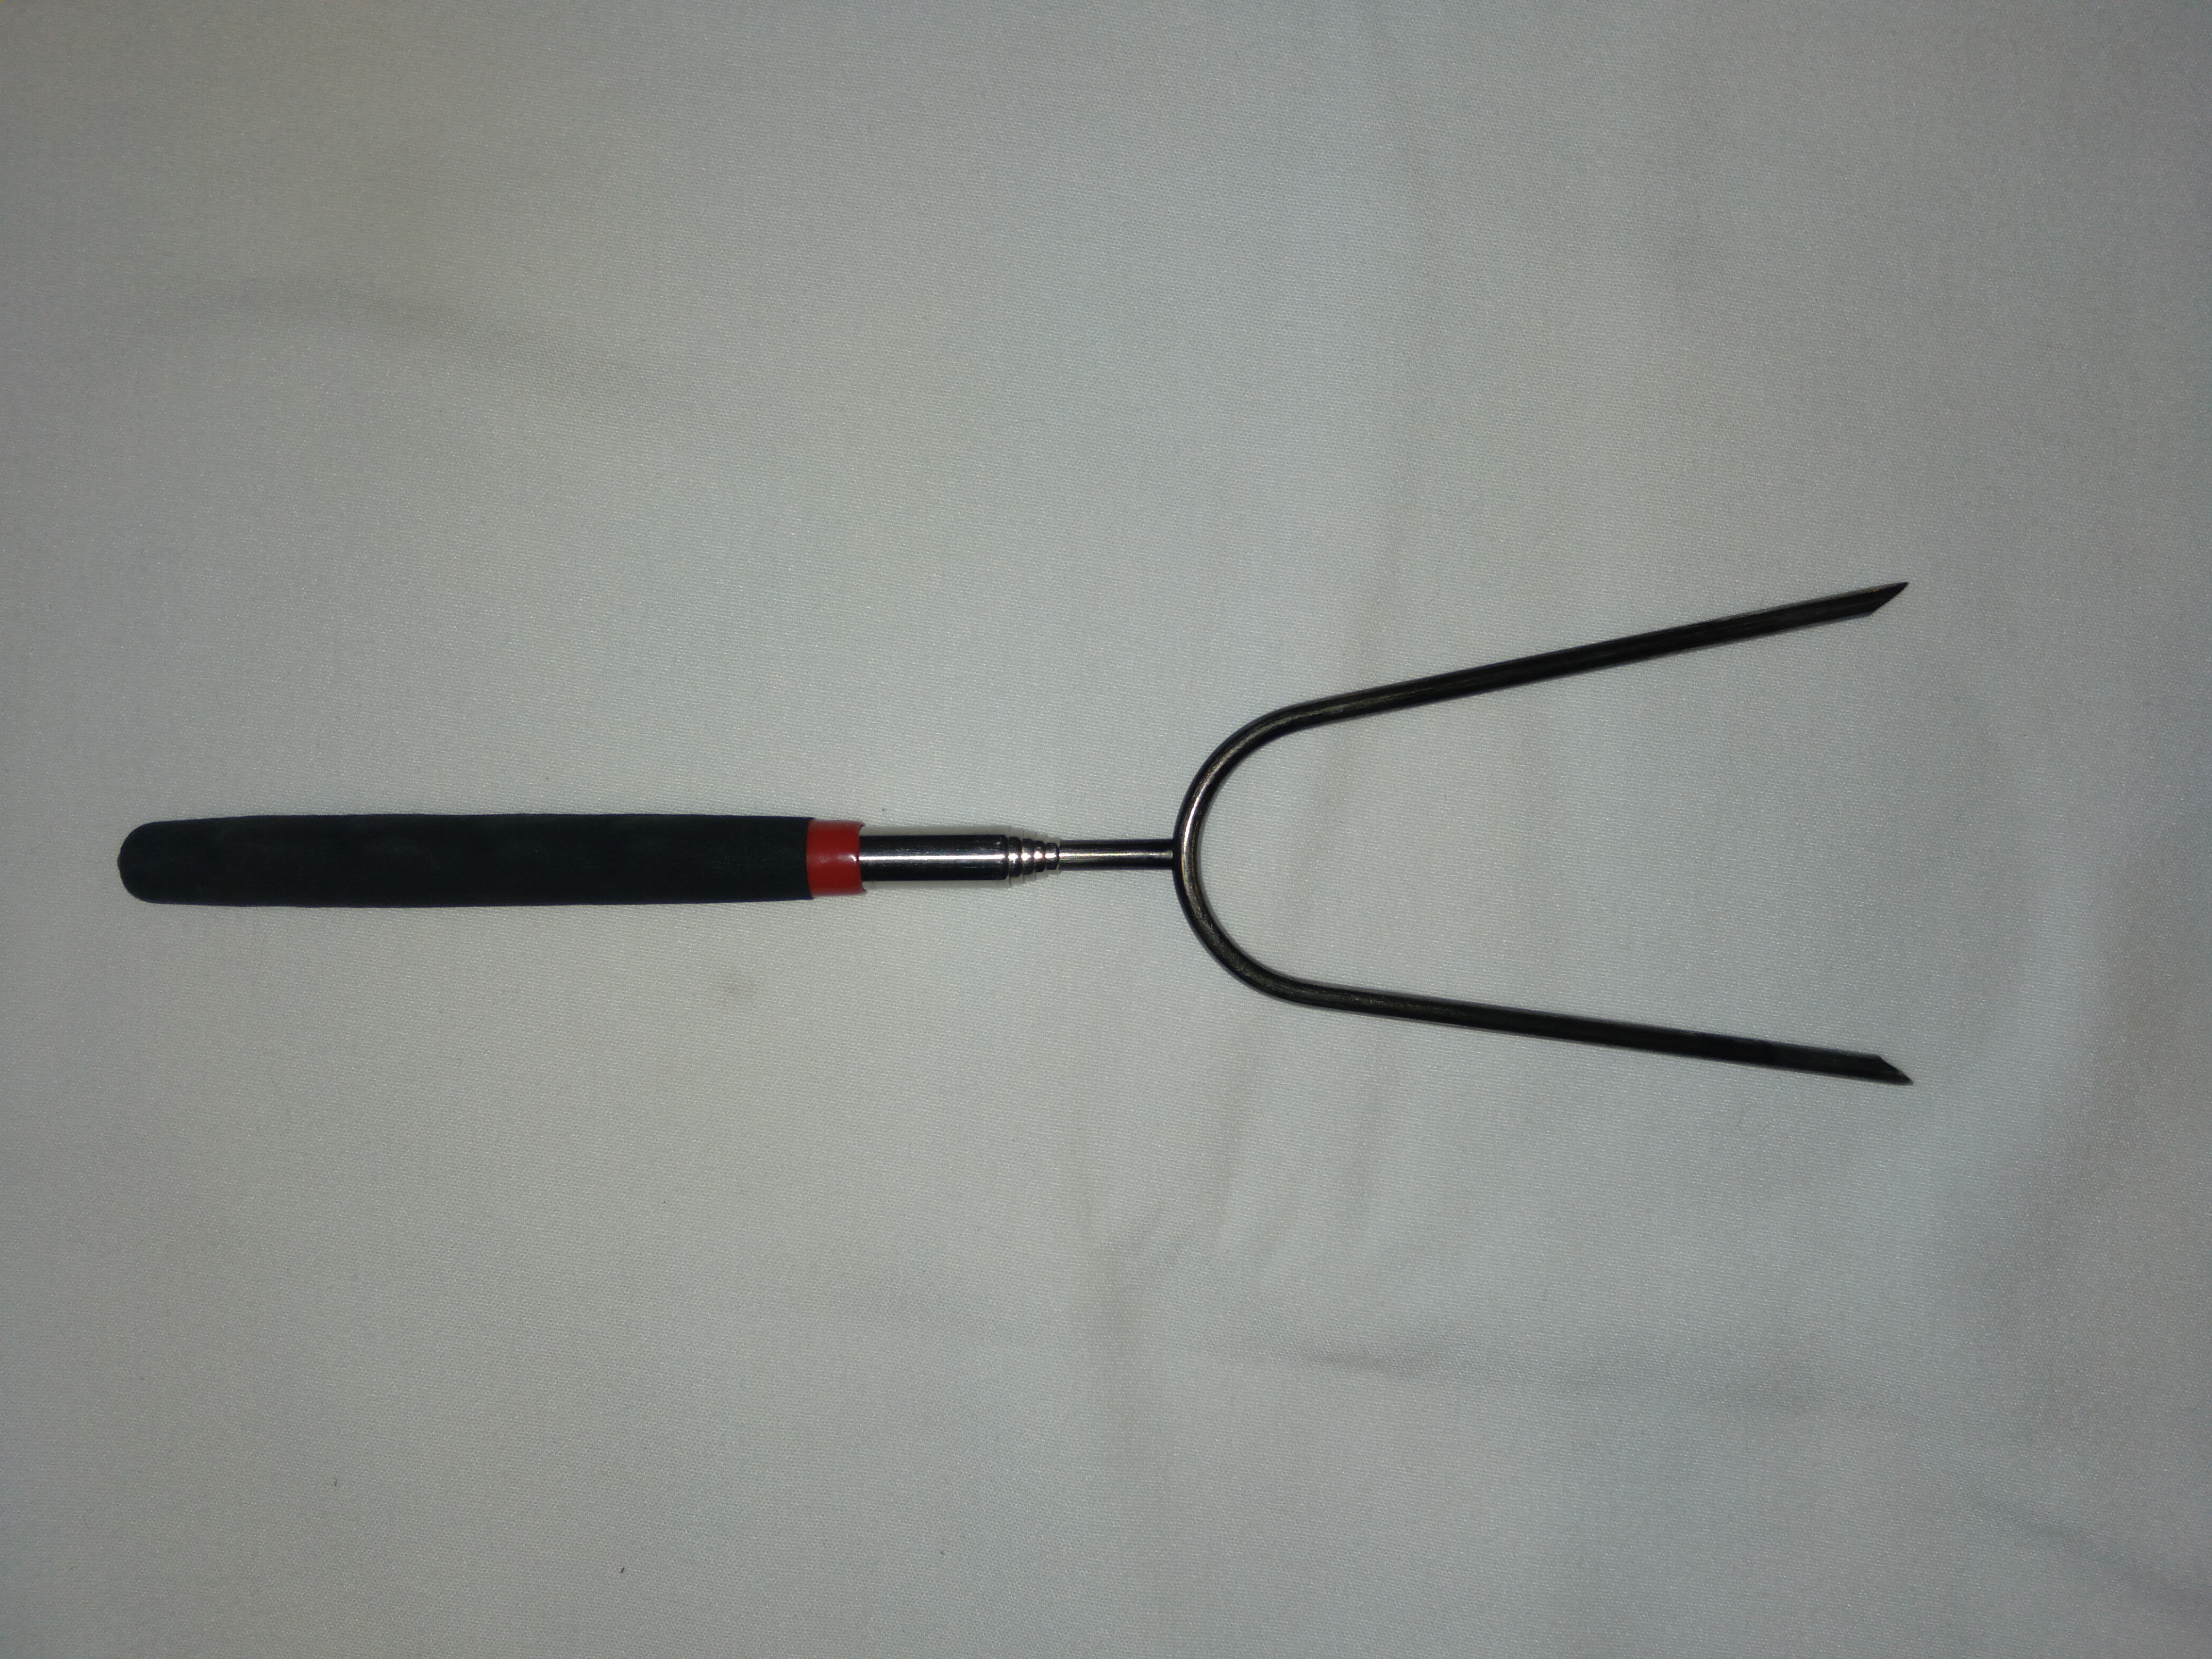
Collapsible 2 Prong fork
This is one of those luxury cooking items that most times could be left at home. However, I do enjoy it’s compact size and convince. Yes, you absolutely can go searching for the right stick, maybe get lucky and find it quick, then whittle a point on it so you can cook your marshmallows, hotdogs, it whatever you brought to roast over the fire. The one I use features a standard U shaped head with 2 prongs to secure your food to and a telescoping handle.
Final Thoughts
So with all aspects of my cooking gear together, I am pleased with it. It works, it does what I need it to do. All in all, there’s not much I would change about it. In the future, I might end up buying some titanium pots to replace my Chinese ones. I definitely am already planning to replace the Peak1 with a lighter option that includes self ignition and maybe a 4th arm for better stability of the cooking pot. Other than that, there’s honestly nothing else I can think that I NEED to change about my kit. Obviously, it’s never going to be perfect, nothing really is. And while I’m building the perfect cooking kit for myself, it’s not gonna be perfect for you. However, in my part of the world, it works better than I could have expected.
Gear Links
The following links may not be to the EXACT gear pictured, however, will be to what I could find comparable to what I have and use. Some are a generalized search so you can pick exactly what you want or give you an idea what might be found at that retail store if it applies.
- https://www.amazon.com/dp/B07RPTYLLS/ref=cm_sw_r_cp_apa_glt_fabc_76ASEPSEWG0PQYD346XG2 piece pot set
- Colman 8oz butane fuel canister
- Colman Peak1 Butane Burner
- Fuel can stabilizer
- Bic Lighter
- Collapsible Tripod
- Collapsible Grill
- Copper Mat
- Gerber Compleat spork set
- Collapsible 2 prong fork


Nice setup. Got all the bases covered, and the gear looks more than adequate!
LikeLike